
-
User guide
- Part 1 - Introduction
- Part 2 - Core Restlet
- Part 3 - Restlet Editions
- Part 4 - Restlet Extensions
- Appendices
- Tutorials
- Javadocs
- Change Log
Guard access to sensitive resources
When you need to secure the access to some Restlets, several options are available. A common way is to rely on cookies to identify clients (or client sessions) and to check a given user ID or session ID against your application state to determine if access should be granted. Restlets natively support cookies via the Cookie and CookieSetting objects accessible from a Request or a Response.
There is another way based on the standard HTTP authentication mechanism. The Restlet Engine currently accepts credentials sent and received in the Basic HTTP scheme and also the credentials sent in the Amazon Web Services scheme.
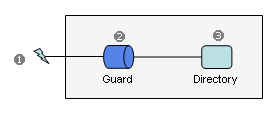
When receiving a call, developers can use the parsed credentials available in Request.challengeResponse.identifier/secret via the ChallengeAuthenticator filter. Filters are specialized Restlets that can pre-process a call before invoking and attached Restlet or post-process a call after the attached Restlet returns it. If you are familiar with the Servlet API, the concept is similar to the Filter interface. See below how we would modify the previous example to secure the access to the Directory:
// Create a simple password verifier
MapVerifier verifier = new MapVerifier();
verifier.getLocalSecrets().put("scott", "tiger".toCharArray());

// Create a Guard
ChallengeAuthenticator guard = new ChallengeAuthenticator(
                getContext(), ChallengeScheme.HTTP_BASIC, "Tutorial");
guard.setVerifier(verifier);

// Create a Directory able to return a deep hierarchy of files
Directory directory = new Directory(getContext(), ROOT_URI);
directory.setListingAllowed(true);
guard.setNext(directory);

return guard;
Note that the authentication and authorization decisions are clearly considered as distinct concerns and are fully customizable via dedicated filters that inherit from the Authenticator (such as ChallengeAuthenticator) and the Authorizer abstract classes. Here we simply hard-coded a single user and password couple. In order to test, let’s use the client-side Restlet API:
// Prepare the request
ClientResource resource = new ClientResource("http://localhost:8182/");

// Add the client authentication to the call
ChallengeScheme scheme = ChallengeScheme.HTTP_BASIC;
ChallengeResponse authentication = new ChallengeResponse(scheme,
        "scott", "tiger");
resource.setChallengeResponse(authentication);

// Send the HTTP GET request
resource.get();

if (resource.getStatus().isSuccess()) {
    // Output the response entity on the JVM console
    resource.getResponseEntity().write(System.out);
} else if (resource.getStatus()
        .equals(Status.CLIENT_ERROR_UNAUTHORIZED)) {
    // Unauthorized access
    System.out
            .println("Access unauthorized by the server, check your credentials");
} else {
    // Unexpected status
    System.out.println("An unexpected status was returned: "
            + resource.getStatus());
}
You can change the user ID or password sent by this test client in order to check the response returned by the server. Remember to launch the previous Restlet server before starting your client. Note that if you test your server from a different machine, you need to replace “localhost” by either the IP address of your server or its domain name when typing the URI in the browser. The server won’t need any adjustment due to the usage of a VirtualHost which accepts all types of URIs by default.