
-
User guide
- Part 1 - Introduction
- Part 2 - Core Restlet
- Part 3 - Restlet Editions
- Part 4 - Restlet Extensions
- Appendices
- Tutorials
- Javadocs
- Change Log
Reach target resources
In the previous example, we took advantage of the flexible routing features of the framework to route the requests while extracting interesting parts from the target URI. But, we didn’t pay attention to the request method, nor to the client preferences regarding the response that he expects. Also, how do we connect our Restlet resources with the backend systems, the domain objects?
So far, we introduced features that go beyond the traditional Servlet API and introduced our support for REST that justify our Restlet name! If haven’t done so already, you can learn more about the REST architecture style and the best practices to follow when applying it to a Web application. There is a related FAQ entry that will give you some starting pointers. If you have some experience with a traditional MVC framework, you can read more about the relationship to Restlet in this other FAQ entry.
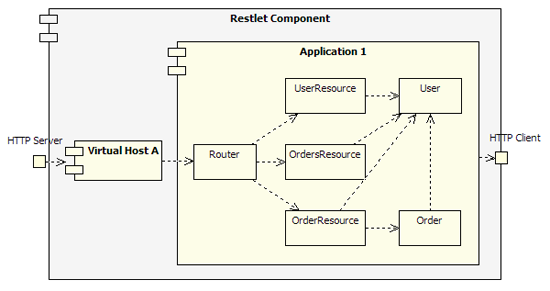
To summarize, a request contains an URI that identifies the target resource that is the subject of the call. This information is stored in the Request.resourceRef property and serves as the basis of the routing as we saw. So the first goal when handling a request is to find the target resource which is in the framework… an instance of the ServerResource class or more precisely one of its subclasses. To help us in this task, we can use the dedicated Finder, a subclass of Restlet, which takes a ServerResource class reference as an argument and which will automatically instantiate it when a request comes in. The resource will dynamically dispatch the call to either a matching annotated method or to a predefined method (get(), post(), put(), delete(), etc.). Of course, this behavior can be customized. There is even an attach() method on Router that can take two arguments, an URI template and a ServerResource class and that transparently creates the Finder for you. Now, let’s have a look at this overall diagram, showing the relationship between the main framework classes involved in this example:
Back to the code, here is our refactored Application.createRoot() method. For simplicity purpose, we didn’t keep the Directory serving static files as this part wouldn’t change. You can notice the way that resource classes are directly attached to the router.
// Create a router
Router router = new Router(getContext());

// Attach the resources to the router
router.attach("/users/{user}", UserResource.class);
router.attach("/users/{user}/orders", OrdersResource.class);
router.attach("/users/{user}/orders/{order}", OrderResource.class);
We will finally review one of the resource classes, the UserResource class. This class derives from org.restlet.resource.ServerResource. We override the doInit() method to retrieve the attribute “user” that is automatically extracted from the “/users/{user}” URI template and store its value in a convenient member variable. At this point, in a full application, we would lookup our associated “user” domain object. Finally, we declare a toString() method that supports the GET method as indicated by the @Get annotation.
public class UserResource extends ServerResource {
    String userName;

    Object user;

    @Override
    public void doInit() {
        this.userName = getAttribute("user");
        this.user = null; // Could be a lookup to a domain object.
    }

    @Get("txt")
    public String toString() {
        return "Account of user \"" + this.userName + "\"";
    }
}
You can have a look at the rest of the code in the tutorial package and test the application. You will obtain the same behavior as in Part11, with the difference that only GET requests will be accepted. If you want to enable PUT for example, you have to create a Java method in UserResource and annotate it with @Put. You can check the Javadocs for further details.